Age of the Eggs
"Old eggs are for boiling, fresh eggs are for frying," is the old chestnut. Well, it's true...to a degree. As anyone who's had fresh-from the hen eggs will tell you, they do fry up beautifully, giving you tall, tall yolks, and tight whites, and trying to peel a very freshly laid boiled egg is difficult—the inner membrane of the shell has a tendency to stick to the white, giving the peeled egg a pockmarked appearance. But these differences disappear within a few days after the egg has been laid. Since eggs in the supermarket can spend up to 30 days before they even hit the shelf, followed by a further 30 days before they hit their expiration date, the point is pretty much moot. So long as you don't keep your own chickens, you can boil eggs with impunity.
pH of the Water
It's true that over time, acidic liquid can dissolve the shell of an egg, and that alkaline liquid can both make the egg easier to peel, as well as boost that "rotten egg" aroma, but in the short period that an egg spends boiling, pH has little to nothing to do with how the egg cooks. Just use plain tap water; don't bother with vinegar or baking soda.
Lid on, or Off?
The only effect it has is on the heat retention and boiling point of the water. Since, as you'll see, we'll be cooking most eggs at below a boil, you don't want to use a cover.
Turns out, the only factors that really do matter when boiling an egg are time and temperature.
The photo below demonstrates what happens when you lower an egg into boiling water. The egg in the upper left corner was boiled for precisely one minute, the one directly to its right was boiled for three minutes, and so on down the line, at two minute intervals, until you finally get to the egg on the bottom right, which was boiled for 15 minutes.

It may seem obvious to state this, but it's such an important point in cooking that I'm going to say it anyway: when a mass is exposed to heat for a given period of time, a temperature gradient will form within that mass, with the area closest to the heat source being hottest, and the area furthest from the heat source being coolest. With very few exceptions, the temperature of a given spot in the food is proportional to the inverse square of its distance from the surface exposed to the heat source.
In other words, the middle of your food is going to cook more slowly than the exterior, and the hotter the heat source, the bigger the temperature differential will be between the center and the exterior.
The Temperature Timeline of Boiling an Egg
Now, here's what happens as an egg white cooks:

Egg yolks, on the other hand, follow a different set of temperatures:
So far so good? Is this all going over easy? Now with all this background information dealt with, we can move on to something a little more eggs-citing: perfecting the boil.
Perfect Soft Eggs

The French have got all kinds of wild descriptions for eggs cooked to various degrees of doneness, but in American culinary terms, in the ideal soft-boiled egg, the white should be completely opaque, but not to the point of rubberiness (somewhere in the range of 155 to 180 degrees), and the yolk should be completely liquid (no hotter than 158 degrees). In this way, with each spoonful, you get tender bites of soft, velvety-smooth white, bathed in a sauce of glorious, bright golden, rich, flavorful yolk. These are the type of soft boiled eggs that'll get you laid.
After a couple cartons of eggs, and a whole mess of egg salad, and what initially seemed like an un-winnable shell game, I determined that time to be eggs-actly 6 minutes, delivering the soft-boiled beauty you see above. Since whites set at 155 degrees and yolks set at 158, you have a tolerance of three degrees to work with, which translates to about 15 seconds in either direction. Use a timer!
Perfect Hard Boiled Eggs

Hard boiled eggs are a little more complicated. The goal is to have both your white and your yolk at the point where they are opaque, but not rubbery. Again, if you are a fancy-pants chef with a thermal circulator, set it at 170 degrees, drop in your eggs, and just wait. At home, we don't have that luxury.
We already know that if we drop the eggs directly into boiling water, the exterior heats up much faster than the interior; by the time the very center of the yolk reaches 170 degrees, the white and outer layers of yolk are hopelessly overcooked, and smell worse than that guy in the elevator.
On the other hand, if you start the eggs in cold water, as the water gently heats up over the burner the eggs gently heat up right along with it, greatly reducing the temperature differential between the interior and exterior (remember the rule: the temperature differential between edge and center is proportional to the strength of the heat source).
This is nothing new. Many recipes instruct you to place the eggs in cold water, bring them to a simmer, shut off the heat, and wait for a prescribed period of time. However, as the photos below demonstrate, this doesn't really work consistently.

In each case, I placed the egg in a volume of cold water, brought the water to a simmer, shut it off, then left the egg in it for precisely ten minutes. As you can clearly see, depending on the initial volume of water (between one quart and four quarts in this case), the cooked eggs run the gamut from slightly undercooked, to totally overcooked! Taking the temperature of the water after 10 minutes confirmed the reason: the one quart pot had dropped to around 145 degrees, while the four quarts pot was still well above 175. No wonder it was overcooking!So this is what I discovered: given that my burner is consistent in its heat output, given that I use the same pot each time, given that my tap water always comes out at around 40 to 45 degrees, and given that my apartment is at a relatively stable temperature year around, there is a precise volume of water I can use to hard boil an egg such that if I start it cold, bring it up to a bare simmer, then immediately shut off the heat, the water temperature will drop to below 170 degrees just as the central yolk temperature reaches 170 degrees, thereby guaranteeing that my egg will be perfectly cooked every single time.
After some more fiddling and a few dozen deviled eggs, I discovered this volume to be 1.5 quarts.

The best part about using this method is that even if you accidentally forget about your egg and leave it sitting in the water, there is no chance that it will overcook, because by the time the egg is done (about ten minutes), the water temperature has dropped far enough that the egg will stop cooking. These two eggs were cooked in the same pot of water—one was removed after 10 minutes, while the other was left for a full thirty. As you can see, they are both perfectly cooked.
The unfortunate part of this technique is that if you use a range that is vastly stronger or weaker than one you are used to, or if you have a very odd-shaped cooking vessel that drastically alters the surface-area to volume ratio of the water, it will require some fiddling with. But for most practical purposes, this will deliver perfect hard boiled eggs every time.
Perfect eggs, but the yolk's on me—all this egg boiling has left me fried.
"Old eggs are for boiling, fresh eggs are for frying," is the old chestnut. Well, it's true...to a degree. As anyone who's had fresh-from the hen eggs will tell you, they do fry up beautifully, giving you tall, tall yolks, and tight whites, and trying to peel a very freshly laid boiled egg is difficult—the inner membrane of the shell has a tendency to stick to the white, giving the peeled egg a pockmarked appearance. But these differences disappear within a few days after the egg has been laid. Since eggs in the supermarket can spend up to 30 days before they even hit the shelf, followed by a further 30 days before they hit their expiration date, the point is pretty much moot. So long as you don't keep your own chickens, you can boil eggs with impunity.
pH of the Water
It's true that over time, acidic liquid can dissolve the shell of an egg, and that alkaline liquid can both make the egg easier to peel, as well as boost that "rotten egg" aroma, but in the short period that an egg spends boiling, pH has little to nothing to do with how the egg cooks. Just use plain tap water; don't bother with vinegar or baking soda.
Lid on, or Off?
The only effect it has is on the heat retention and boiling point of the water. Since, as you'll see, we'll be cooking most eggs at below a boil, you don't want to use a cover.
Turns out, the only factors that really do matter when boiling an egg are time and temperature.
The photo below demonstrates what happens when you lower an egg into boiling water. The egg in the upper left corner was boiled for precisely one minute, the one directly to its right was boiled for three minutes, and so on down the line, at two minute intervals, until you finally get to the egg on the bottom right, which was boiled for 15 minutes.
It may seem obvious to state this, but it's such an important point in cooking that I'm going to say it anyway: when a mass is exposed to heat for a given period of time, a temperature gradient will form within that mass, with the area closest to the heat source being hottest, and the area furthest from the heat source being coolest. With very few exceptions, the temperature of a given spot in the food is proportional to the inverse square of its distance from the surface exposed to the heat source.
In other words, the middle of your food is going to cook more slowly than the exterior, and the hotter the heat source, the bigger the temperature differential will be between the center and the exterior.
The Temperature Timeline of Boiling an Egg
Now, here's what happens as an egg white cooks:
- From 30 -140 degrees: As it gets hot, its proteins, which resemble coiled up balls of yarn, slowly start to uncoil.
- At 140 degrees: Some of these uncoiled proteins—called ovotransferrin—begin to bond with each other, creating a matrix, and turning the egg white milky and jelly-like (like the innermost layers of egg white in the 3-minute egg above).
- At 155 degrees: The ovotransferrin has formed and opaque solid, though it is still quite soft and moist (see the white of the 5-minute egg).
- At 180 degrees: The main protein in egg whites—ovalbumen—will cross-link and solidify, giving you a totally firm egg white (see the whites of the 7 and 9 minute eggs). This is very similar to the gunk that seeps out of the surface of overcooked salmon.
- 180 degrees-plus: The hotter you get the egg, the tighter these proteins bond, and the firmer, drier, and rubbier the egg white becomes (the 11-15 minute eggs). Hydrogen Sulfide, or "rotten-egg" aromas, begin to develop. Ick.
Egg yolks, on the other hand, follow a different set of temperatures:
- At 145 degrees: They begin to thicken and set up.
- At 158 degrees: They become totally firm, but are still bright orange and shiny.
- At 170 degrees: They become pale yellow and start to turn crumbly.
- 170 degrees-plus: They dry out and turn chalky. The sulfur in the whites rapidly reacts with the iron in the yolks, creating ferrous sulfide, and tinging the yolks.
So far so good? Is this all going over easy? Now with all this background information dealt with, we can move on to something a little more eggs-citing: perfecting the boil.
Perfect Soft Eggs
The French have got all kinds of wild descriptions for eggs cooked to various degrees of doneness, but in American culinary terms, in the ideal soft-boiled egg, the white should be completely opaque, but not to the point of rubberiness (somewhere in the range of 155 to 180 degrees), and the yolk should be completely liquid (no hotter than 158 degrees). In this way, with each spoonful, you get tender bites of soft, velvety-smooth white, bathed in a sauce of glorious, bright golden, rich, flavorful yolk. These are the type of soft boiled eggs that'll get you laid.
So long as your water never come above 180 degrees—at sea level, that's the quivering stage just below a simmer—you have no chance of overcooking
So long as your water never come above 180 degrees—at sea level, that's the quivering stage just below a simmer—you have no chance of overcooking and toughening the whites beyond the stage where ovalbumen just begins to set. Given that you're using large eggs (eggs are remarkably well-sized, and are very consistent from carton to carton), that the eggs came from the fridge (around 37 degrees), and that you're starting with a volume of 180 degree water large enough that it doesn't significantly drop in temperature when you lower your eggs into it (three quarts of water is enough for anywhere from one to a half dozen eggs), then the only other variable remaining is the length of time you cook it for.
After a couple cartons of eggs, and a whole mess of egg salad, and what initially seemed like an un-winnable shell game, I determined that time to be eggs-actly 6 minutes, delivering the soft-boiled beauty you see above. Since whites set at 155 degrees and yolks set at 158, you have a tolerance of three degrees to work with, which translates to about 15 seconds in either direction. Use a timer!
Perfect Hard Boiled Eggs
Hard boiled eggs are a little more complicated. The goal is to have both your white and your yolk at the point where they are opaque, but not rubbery. Again, if you are a fancy-pants chef with a thermal circulator, set it at 170 degrees, drop in your eggs, and just wait. At home, we don't have that luxury.
We already know that if we drop the eggs directly into boiling water, the exterior heats up much faster than the interior; by the time the very center of the yolk reaches 170 degrees, the white and outer layers of yolk are hopelessly overcooked, and smell worse than that guy in the elevator.
On the other hand, if you start the eggs in cold water, as the water gently heats up over the burner the eggs gently heat up right along with it, greatly reducing the temperature differential between the interior and exterior (remember the rule: the temperature differential between edge and center is proportional to the strength of the heat source).
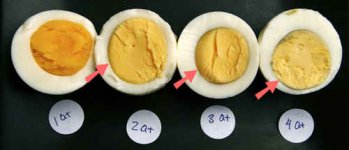
This is nothing new. Many recipes instruct you to place the eggs in cold water, bring them to a simmer, shut off the heat, and wait for a prescribed period of time. However, as the photos below demonstrate, this doesn't really work consistently.
In each case, I placed the egg in a volume of cold water, brought the water to a simmer, shut it off, then left the egg in it for precisely ten minutes. As you can clearly see, depending on the initial volume of water (between one quart and four quarts in this case), the cooked eggs run the gamut from slightly undercooked, to totally overcooked! Taking the temperature of the water after 10 minutes confirmed the reason: the one quart pot had dropped to around 145 degrees, while the four quarts pot was still well above 175. No wonder it was overcooking!So this is what I discovered: given that my burner is consistent in its heat output, given that I use the same pot each time, given that my tap water always comes out at around 40 to 45 degrees, and given that my apartment is at a relatively stable temperature year around, there is a precise volume of water I can use to hard boil an egg such that if I start it cold, bring it up to a bare simmer, then immediately shut off the heat, the water temperature will drop to below 170 degrees just as the central yolk temperature reaches 170 degrees, thereby guaranteeing that my egg will be perfectly cooked every single time.
After some more fiddling and a few dozen deviled eggs, I discovered this volume to be 1.5 quarts.
The best part about using this method is that even if you accidentally forget about your egg and leave it sitting in the water, there is no chance that it will overcook, because by the time the egg is done (about ten minutes), the water temperature has dropped far enough that the egg will stop cooking. These two eggs were cooked in the same pot of water—one was removed after 10 minutes, while the other was left for a full thirty. As you can see, they are both perfectly cooked.
The unfortunate part of this technique is that if you use a range that is vastly stronger or weaker than one you are used to, or if you have a very odd-shaped cooking vessel that drastically alters the surface-area to volume ratio of the water, it will require some fiddling with. But for most practical purposes, this will deliver perfect hard boiled eggs every time.
Perfect eggs, but the yolk's on me—all this egg boiling has left me fried.